SmartPM/Procore Integration Video
Learn how to integrate your ProCore account with your SmartPM account and transfer your project schedule information from ProCore to be analyzed by SmartPM.
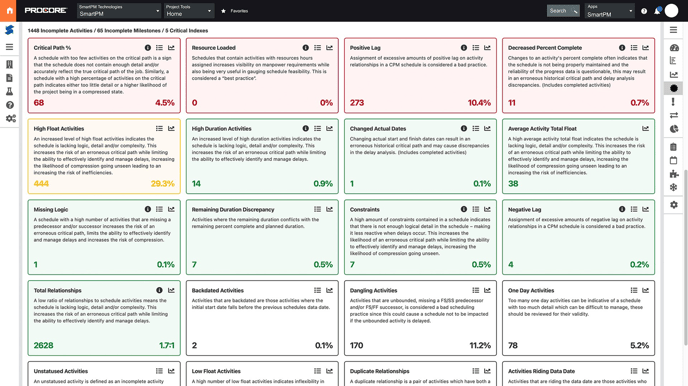
In this video, we will go through how to sync schedules that have been loaded into Procore with SmartPM to produce deeper schedule analytics.
SmartPM needs a native XER Primavera file or a native MPP Microsoft Project file to load into the system to create your schedule analytics.
Before starting, make sure that:
- Your email address must match between Procore and SmartPM
- You are not logged into SmartPM directly when trying to launch via Procore (we are looking at ways to possibly solve this)
- That you have 3rd party cookies enabled
How to link or create a project in SmartPM to your Procore project:
- Click on a project in Procore.
- Go to project Tools and click on Documents.
- Go to the schedules folder, and verify that you have schedules files loaded into your Procore project.
- Go towards the right corner of your Procore window, click Select app and select the SmartPM app. SmartPM is going to check to see if there is an existing project that is linked to the project in Procore. If it does not find a link, it's going to give you two options:
- Link an existing smart pm project to my Procore project.
- Create a brand new project in smart pm with the schedules from my Procore project.
- Click import project and click Continue. SmartPM will then identify the schedules from Procore and automatically load them in.
- The last step is to fill in the postal code here and click Import.
Smart pm will then load the schedules and create a brand new project with those schedules. Now I can see the project has been imported. My analysis is in progress, and I'll get an email once the analysis is finished. And then I can continue to study the data in SmartPM. Now you have a project in SmartPM either created or linked by the Procore project. Every time you load a new schedule into Procore, you can have that schedule pushed to your SmartPM project and the analytics refreshed.
How to load a schedule into Procore
- Go to Project tools schedule in Procore
- Click upload schedule
- Drag and drop your new schedule file and click Update
- Once that schedule is uploaded to Procore, you can come back to the schedules folder in My Documents tool, and see the new schedules uploaded.
- Click Apps, click on SmartPM. Smart pm will then load check Procore for any new schedules, identify the new schedule you just loaded, and ask if you want to import it again. You can click yes or no.
SmartPM will now upload that schedule to your project and Run the delay analysis automatically. You will get the message that you successfully imported the project and you will get an email once that analysis is done. So it's as simple as that if you are already loading schedules into Procore, you can push them to SmartPM with a click of a button. SmartPM will generate all the deep scheduling analytics with the schedules you already have in your Procore database.
Procore Set-Up
This is a quick guide on how to set up the connection between SmartPM and Procore.
1. Log into Procore system.
2. Go to Apps Select and App → Marketplace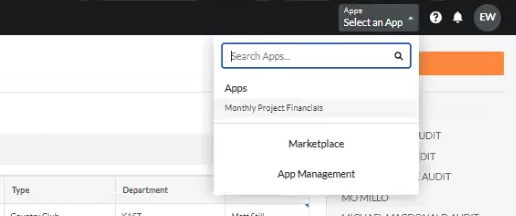
3. Search for SmartPM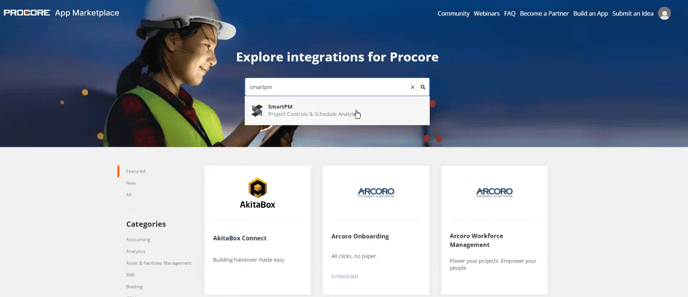
4. Click on Install
5. Go back to the company portfolio page, click on Apps Select an App → App Management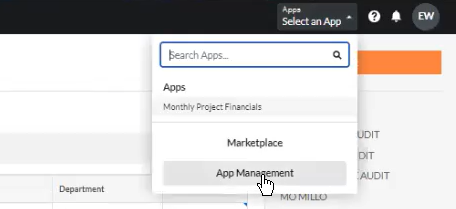
6. Search for SmartPM, click on View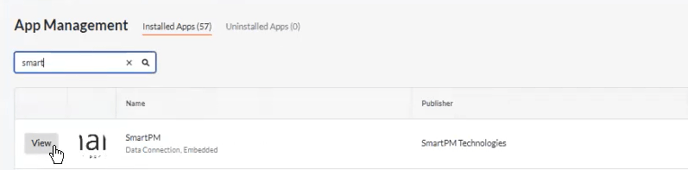
7. Click on Configurations → Create Configuration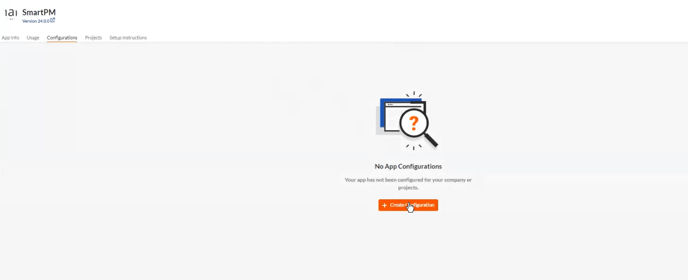
8. In here you have two options:
a. You can choose to configure by specific projects, but every time a project is added in SmartPM, you will need to have the admin include this project in the configuration.
b. or, you can choose the Global Projects Config, but if there are projects in Procore that you don’t want to move to SmartPM, when you open the project SmartPM won’t work on them.
9. We are choosing a global config, put a title for it and click Create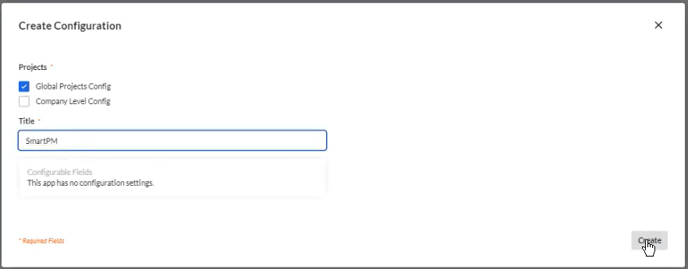
10. Select a project on Procore.
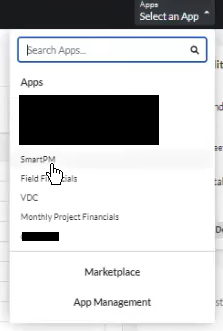
11. On Apps Select an App, choose SmartPM
12. Procore will ask if you allow SmartPM to use your Procore account. Click Allow
13. Choose to Link to an existing project on SmartPM, or import a new one and click Continue.
14. If you are linking to an existing project, choose the SmartPM project you are linking it to.
a. This will only be asked the first time a project is linked.
15. You’ll be asked if you’d like to Update Project with Missing Schedules or Continue to Project Workspace if there are schedules in Procore that are not present in SmartPM.
16. If you choose to just continue to Project Workspace you are ready to use SmartPM in Procore.
17. If you choose to update the project with missing schedules, you will be asked to choose which files you DO NOT want to upload from a list of all the missing schedules found in Procore.
a. Remember, SmartPM requires that all files for the same project have to be the same type.
18. Click on Import Schedules.
19. After the Delay Analysis of those schedules uploaded are finished, you’ll be ready to use SmartPM in Procore.
20. If you want to Import a Project, you’ll be redirected to SmartPM’s Add New Project screen. You can follow the steps in here to create a project in SmartPM.
21. The user is now able to use SmartPM inside Procore: